(SPEECH)
[00:00:00.00] [MUSIC PLAYING]
(DESCRIPTION)
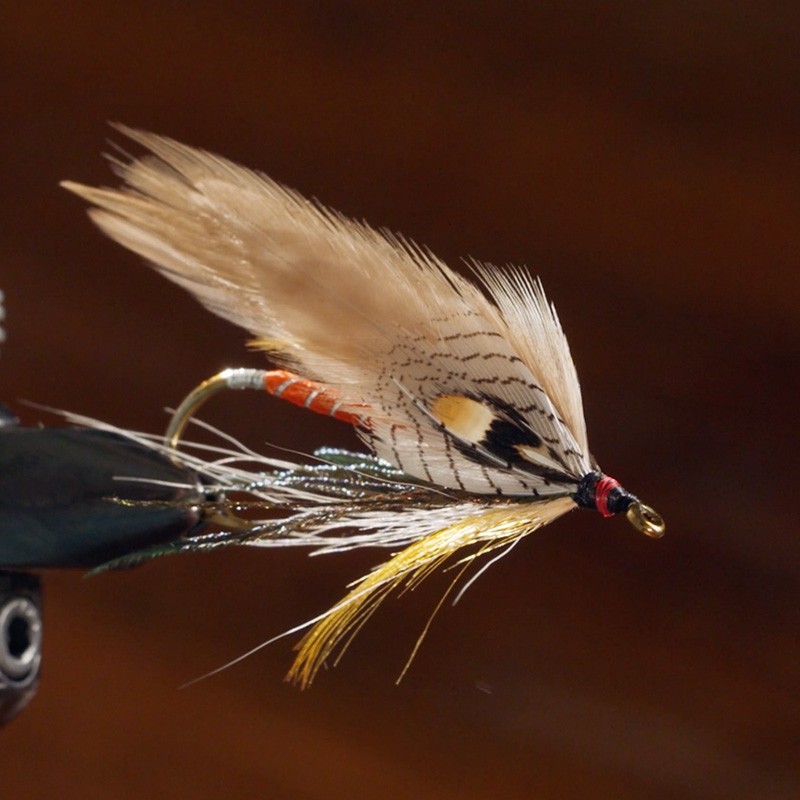
[00:00:00.00] A feathery fly rotates. Title: Fly Tying with L L Bean
[00:00:03.94] Text: The Grey Ghost Streamer
(SPEECH)
[00:00:06.89] Hi, everybody. I'm Emily Bastian, assistant manager and fly tying instructor at L.L.Bean Hunting and Fishing store in Freeport, Maine. If you're a fly angler, and you're thinking about Maine, Carrie Stevens should be one of the first people you think of. In the 1920s, she developed an amazing number of famous streamer patterns while living at upper dam in Rangeley. And today, I'm very excited to show you how to tie Carrie's most famous creation, the Grey Ghost, tied in traditional feather wing style, true to Carrie Stevens' original recipe.
[00:00:39.06] The Grey Ghost was designed to mimic a smelt, a rainbow smelt, a fresh water bait fish that brook trout and landlocked salmon love. Legend has it that Stevens first tested her fly in the big pool at upper dam, and promptly caught a 6-pound brook trout. While we can't guarantee that you'll catch a 6-pound brook trout with this fly, it's certainly possible. And you will catch a lot of nice fish.
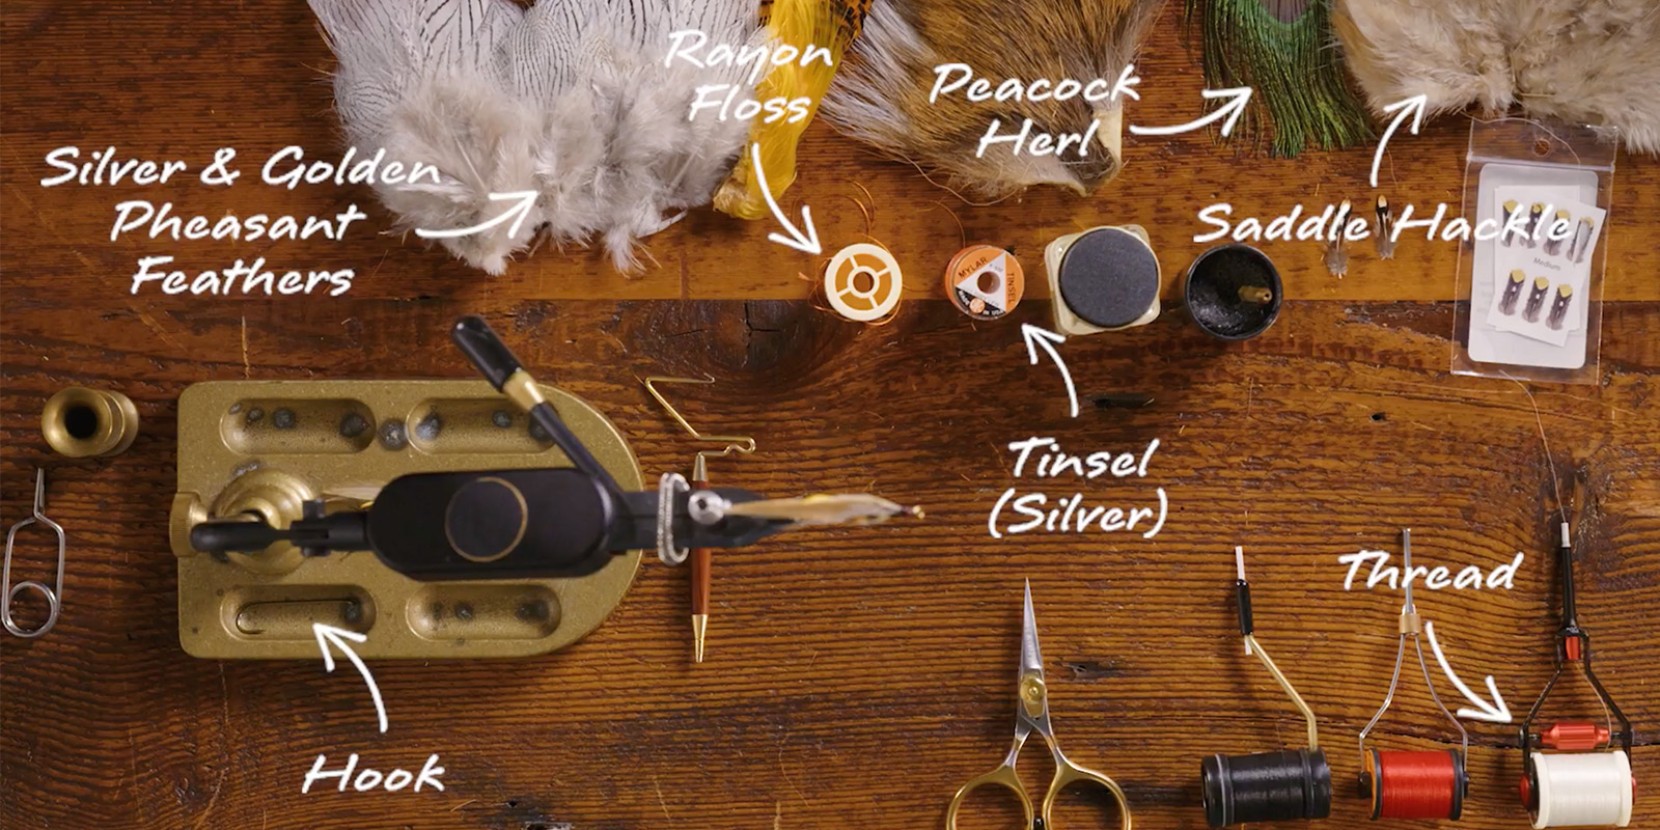
[00:01:04.16] Here are the materials you'll need to tie the Grey Ghost. Hook is a 7X traditional long shank streamer hook, such as those made by Partridge. Thread is 6 aught or 140 denier in white for the underbody, black for the remainder of the fly, and finishing with red for the accent on the head. The tag and rib is flat, extra small, silver tinsel. Body, orange, four strand, rayon floss.
[00:01:33.51] Throat is constructed with four to five strands of Peacock Herl right from the eye feather, a small bunch of white bucktail and golden pheasant crest feathers that are as long as the shoulder and curving upward. The wing is four matched grey saddle hackles. The shoulders of the fly are four silver pheasant body feathers. And the cheeks-- Jungle Cock eye, real. Or imitation can be used as well. There's a link to a PDF of the full list of materials in the description below.
[00:02:08.21] We'll start by affixing the hook in the vise. I am using a very traditional streamer hook here. It's a size 4, 7X long. And contrary to my normal practice, I'm not going to pinch that. barb. We're going to leave this as a traditional presentation grade fly, although it would be a shame not to fish it, in which sense, I would pinch the barb before I took it on the water.
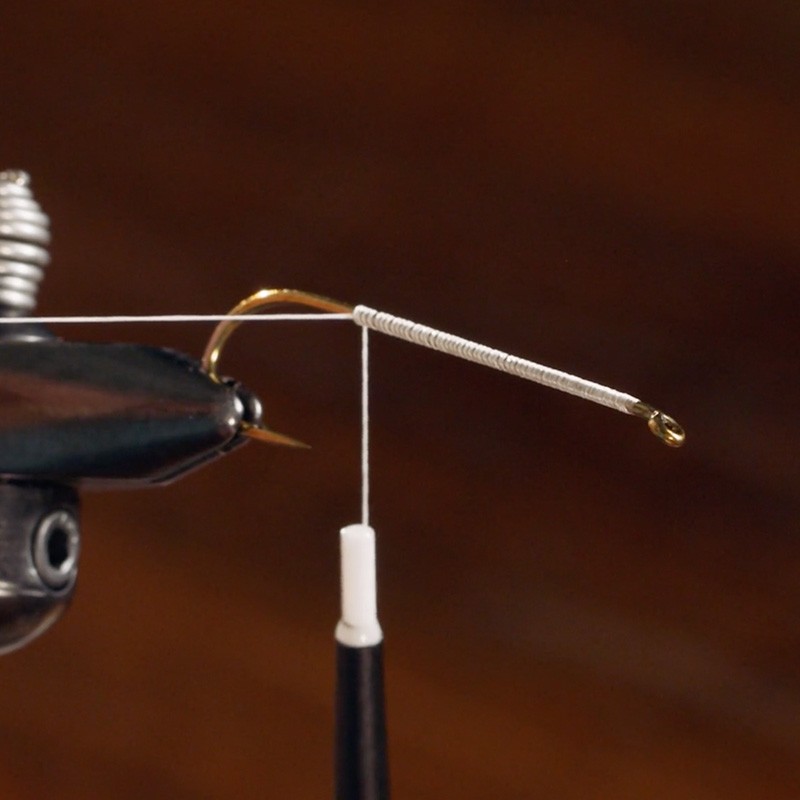
[00:02:33.92] You'll begin, as always, by laying down a base of thread on your hook shank. I'm using white 6 aught Danville thread, and I like the Danville because I can make it flat. It will flatten out. It's not corded. Being very cognizant of touching thread wraps, laying them uniformly and evenly along the shank of the hook. And the reason for that is that you really want to have a very smooth, consistent underbody to this fly so that the floss, once you wrap the floss for the body, it doesn't have any lumps or bumps.
(DESCRIPTION)
[00:03:15.47] Snips the thread.
(SPEECH)
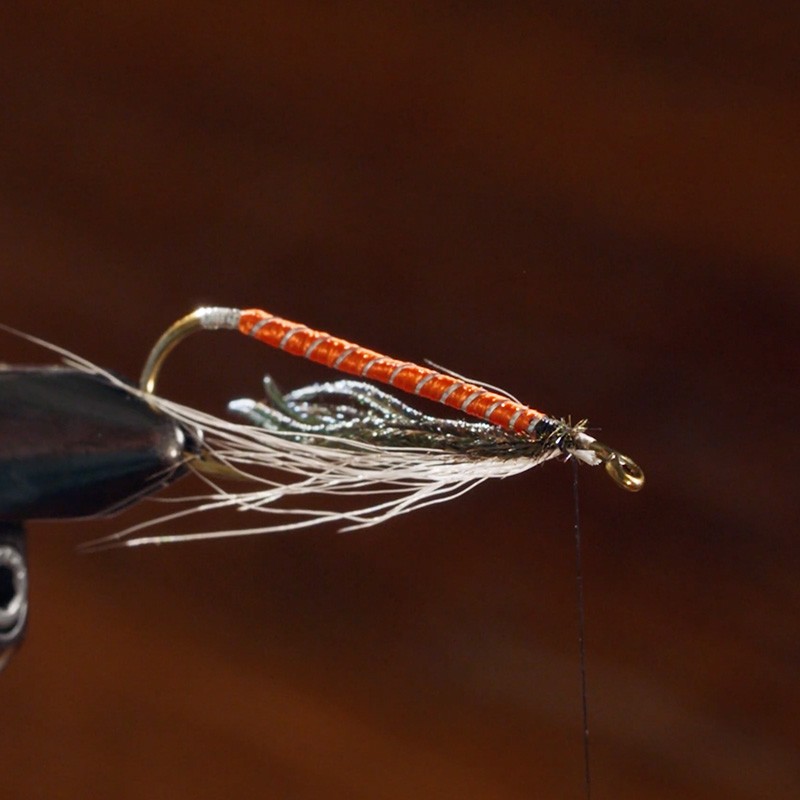
[00:03:16.69] So I've stopped right before the point of the hook. This is where I'm going to tie in my tinsel, which will be for the tag of the fly. This fly does not have a tail, so the first ingredient is the tinsel tag. We're using Mylar tinsel size. Extra small Mylar tinsel has gold on one side and silver on the other side, so we need to be mindful of that when we tie the tinsel in on the shank of the hook so that the correct color is showing. And that would be silver for this pattern.
[00:03:51.82] In the fashion that I tie my materials in for a fly like this, not wanting to have any excessive thread wraps, I'm going to just bring that material up between the thread and the shank of the hook. And see, I didn't even have to wrap anything to hold it in position. Now I can just pull that back with my fingers and get it to the length that I want it. You'll see I'm leaving the tag end to incorporate into the underbody of the fly.
(DESCRIPTION)
[00:04:17.17] Holds the tag end.
(SPEECH)
[00:04:18.36] So I'm wrapping back to the point where my thread is halfway between the point and the barb, which is where I'll start wrapping my tag. Invert the hook, and we're wrapping the silver tag. With the extra small, you're going to need to wrap about six or eight times back because you want that tag to end right above about where the Barb is.
(DESCRIPTION)
[00:04:48.90] She wraps using both hands.
(SPEECH)
[00:04:51.24] And then wrap forward. So you have double coverage, just to ensure that you don't have any gaps where the bear hook is showing through.
(DESCRIPTION)
[00:05:02.17] She turns the vise with the barb facing up, then turns it back down to tie it off.
(SPEECH)
[00:05:07.11] And then I'm going to tie that off. Now we'll leave that because that is the same material that we'll use for the rib of the fly. Now it's time to tie in the body material, which is a floss body. We're using rayon floss, Danville's Rayon Floss. It's a four-strand floss, and we're going to use all four strands for a fly of this size.
(DESCRIPTION)
[00:05:32.02] She unwinds the floss.
(SPEECH)
[00:05:33.72] And give myself plenty of length. Nothing more frustrating than coming up short when you're trying to wrap a floss body.
[00:05:48.12] Wet the ends a little bit so that they stay together for tying in.
(DESCRIPTION)
[00:05:51.83] She wets the ends with her damp fingers.
(SPEECH)
[00:05:54.11] I'm going to bring that material just like I did with the tinsel up onto the side of the hook shank.
(DESCRIPTION)
[00:06:00.63] She moves the mylar.
(SPEECH)
[00:06:02.93] Mylar is getting away from me a little bit.
(DESCRIPTION)
[00:06:07.33] She positions the threads and floss, then trims the end of the floss.
(SPEECH)
[00:06:11.75] All right, I'm going to wrap my thread forward and incorporate that floss into the underbody of the fly the best I can, trim that a little bit so it stays closer to where I need it to be.
[00:06:29.57] Try to prevent it from wrapping too much around the shank of the hook. You can hold it in place with your fingers. You can also utilize a balanced thread wrap so that you have tension on the thread as you come around the thread shank of the hook. But when you catch the material, you let up on that tension a little bit to help prevent it from wrapping around the hook. Takes some practice.
(DESCRIPTION)
[00:06:54.11] Continues to wrap the floss with thread.
(SPEECH)
[00:06:57.39] But really, ultimately our goal here is to ensure a smooth underbody of the fly. So if it twists a little bit, as long as it stays nice and smooth, the end result will be the same.
(DESCRIPTION)
[00:07:13.14] She stops once the floss is covered.
(SPEECH)
[00:07:16.11] All right, and I'm going to leave plenty of length between where my thread is now and the eye of the hook so that I have room to tie-in all of my materials up at the front of the fly. Now it's time to wrap the floss.
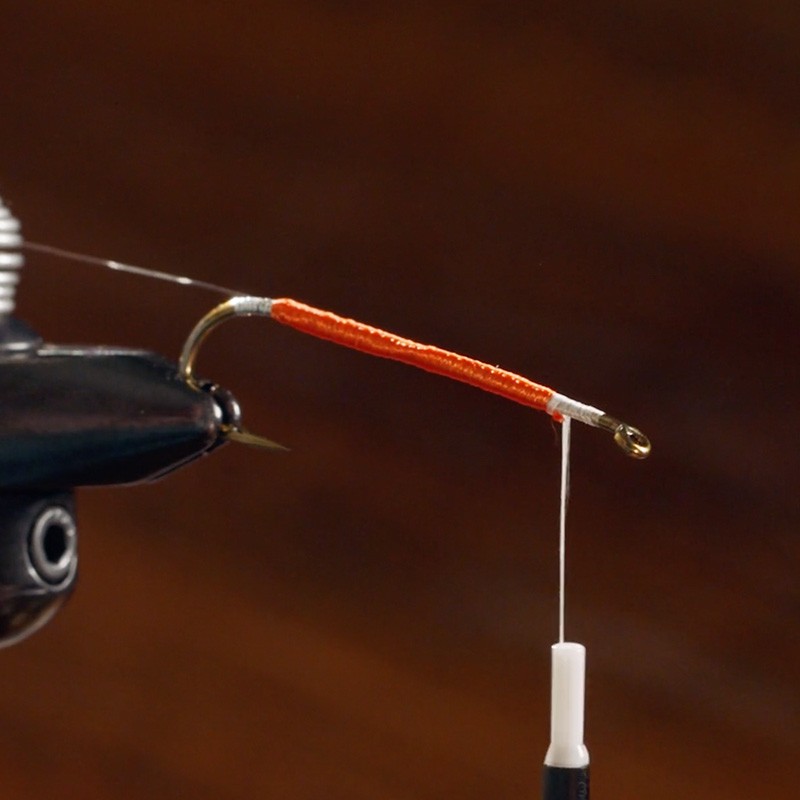
[00:07:32.25] I'm stroking this floss so that I can get all four fibers to lay straight and flat. You can see how the light catches on the fibers. Then I know that it's where I want it to be, and I'm going to start wrapping forward, overlapping each wrap by about half, 50%, to ensure complete coverage.
[00:07:58.38] So there's no white thread coming through. There's no irregularities or bumps in the body of the fly.
(DESCRIPTION)
[00:08:08.38] She uses both hands to wrap.
(SPEECH)
[00:08:10.46] Maintain even tension on your floss as you rap forward. That's the trick to keeping those strands together and flat and uniform.
(DESCRIPTION)
[00:08:22.49] The video plays in fast motion as she finishes wrapping. Then she snips the floss.
(SPEECH)
[00:08:27.98] Once my floss is secured, I can trim the tag end. And now it's a great time for a whip finish for two reasons. One, if you were to lose tension on your thread and have that and all that floss come unraveled, you'd be right back where you started again.
(DESCRIPTION)
[00:08:51.17] She whips it with a tool.
(SPEECH)
[00:08:53.17] And we're also going to be switching now to the black thread, the finishing thread.
(DESCRIPTION)
[00:08:58.52] She snips the white thread close to the hook.
(SPEECH)
[00:09:00.94] The reason we use the white was for the underbody and consistency and color so that when that fly gets wet, it has the true orange floss and not a darkened color. But the black is the color that you want for finishing off the head of the fly.
(DESCRIPTION)
[00:09:18.20] She wraps a narrow band of the black thread, then snips it.
(SPEECH)
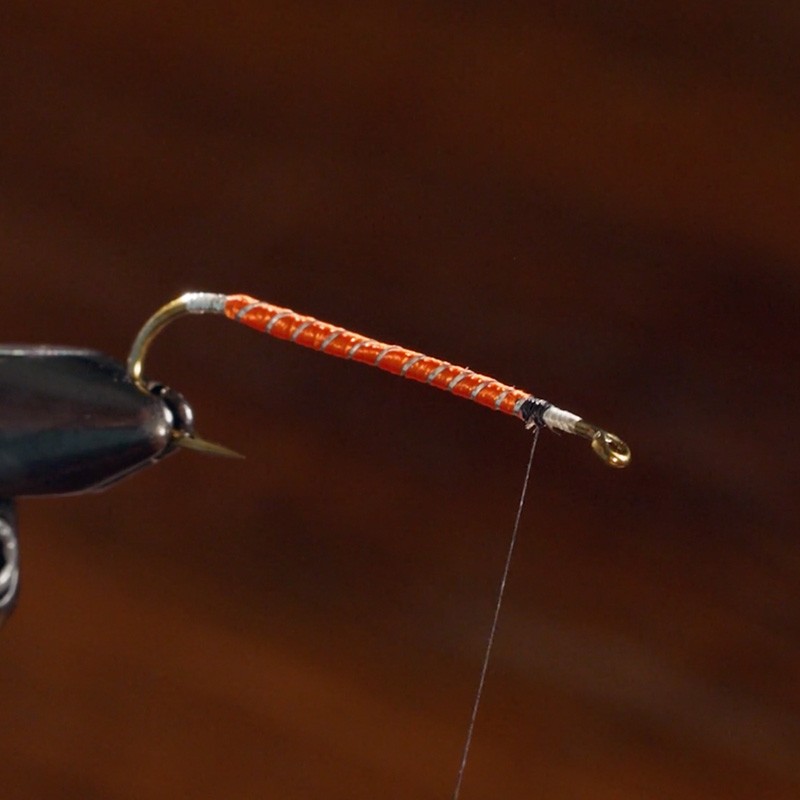
[00:09:24.88] Next, I'll wrap my ribbing forward, and I want the silver up. You're going to aim for wraps that are equidistant, nice and uniform, angling forward. You end up with about a dozen wraps on this size hook. Remember, this is a 7X long, so it's a pretty long, traditional streamer hook.
[00:09:57.34] You're not going to see that last wrap. It'll be buried by all the materials in the cheeks. I had just enough there.
(DESCRIPTION)
[00:10:07.10] Snips the tinsel end.
(SPEECH)
[00:10:08.44] If you find yourself coming up short, and you cut your tinsel too short, sometimes using hackle pliers to wrap the tinsel is helpful. So it doesn't slip from your fingers.
[00:10:21.10] I'm going to throw another whip finish in here for good measure, and just to make sure that tinsel doesn't come unraveled. Now, if you were tying a dozen or so of these flies for efficiency, I would recommend tying up a bunch of bodies, just like this. You'd stop right here, trim your thread off, set it aside, and then coming back and tying in the rest of the materials in the throat and the wing. But we'll go through the whole thing today.
[00:10:50.43] We're ready now to start tying in the throat of the fly. First material is Peacock Herl. Now, you can buy Peacock Herl strung, but I like to use Herl from the I feather. Reason being you have much less of the damaged tip sections on a full eye feather, as opposed to the strong Herl.
[00:11:12.84] So I'm just going to pull off or trim off a couple pieces, two to three from each side. You're aiming for about four to five feathers in that throat. I'm going to even up the tips the best I can.
(DESCRIPTION)
[00:11:27.79] She pinches the ends of the tips between her fingers.
(SPEECH)
[00:11:31.44] Sizing those feathers, you want them to come right to the bend of the hook there, so just inside the bend.
(DESCRIPTION)
[00:11:36.80] Holds then next to the hook.
(SPEECH)
[00:11:38.73] I'm going to pinch those between my thumb and middle finger and come up with a loose collecting wrap, a couple of wraps, and apply the tension as I come down this time. That will bring the materials flush to the bottom of the hook. And that looks perfect.
(DESCRIPTION)
[00:11:58.41] She snips the long end of the feathers
(SPEECH)
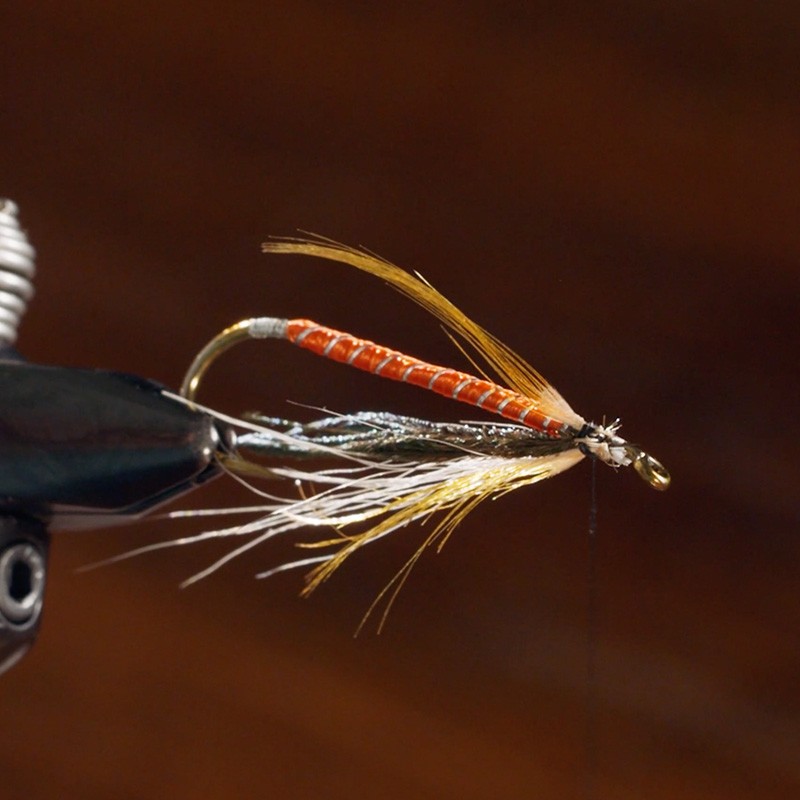
[00:12:03.84] Next is a small clump of white bucktail. This is Northeast white-tailed deer, natural color, not dyed. We'll find a small clump of fibers from about 2/3 of the way, halfway up the tail.
(DESCRIPTION)
[00:12:20.59] She pulls a clump from the tail.
(SPEECH)
[00:12:22.68] And trim those out at the base. You want this to be pretty sparse to be consistent with Carrie's original pattern.
[00:12:31.29] I'm going to hold the tips firmly between my thumb and forefinger, and pull out all the shorter fibers that don't contribute to the overall profile that we're looking for here. And then trim, just to make them a little easier to work with before we put them in the hair stacker to align the tips.
(DESCRIPTION)
[00:12:56.39] She inserts them into the hair stacker, which is cylinder shaped, and taps.
[00:13:08.48] Then she takes them out and holds them next to the hook.
(SPEECH)
[00:13:12.89] The length will be equal to the length of our Peacock Herl.
(DESCRIPTION)
[00:13:18.69] She snips the ends.
[00:13:21.51] Then presses them next to the hook.
(SPEECH)
[00:13:23.87] There we go, so similar technique for tying those in. There's that.
(DESCRIPTION)
[00:13:34.59] She ties and trims.
(SPEECH)
[00:13:36.71] Trim those was buttons.
[00:13:41.24] Final ingredient in the throat of the fly is a golden pheasant crest feather. This is a golden pheasant head and shoulder. These barred feathers are beautiful and perfect for a lot of different streamer and wet fly patterns, but we don't need those in this particular pattern. We're just going to use the golden crest feathers here.
[00:14:02.84] Now, I'm going to pick out two of equal length, and I'll show you how those are going to be oriented. I've got more than two. That's all right.
(DESCRIPTION)
[00:14:16.64] She sorts the crest feathers.
(SPEECH)
[00:14:19.25] So we're looking for one that has a nice natural curvature upward. And it's going to be tied in at the belly here, and just short of the tips of those other materials that we had in. So that looks about perfect for length. I'm going to strip off the fluff. Prepare the tie-in point.
(DESCRIPTION)
[00:14:41.01] She snips while pinching the ends between her thumb and forefinger.
(SPEECH)
[00:14:44.99] And one little trick that can be pretty handy, because this feather sometimes likes to try to turn around the hook, it doesn't behave very well or maintain that curve, unless you take a tool, like a set of tweezers, and flatten the stem at the point where you're going to tie this in,
(DESCRIPTION)
[00:15:03.53] She pinches the end with tweezers.
(SPEECH)
[00:15:07.94] like that.
(DESCRIPTION)
[00:15:11.99] She aligns the bundle over the hook.
[00:15:15.35] Then she ties it on and snips it.
(SPEECH)
[00:15:20.63] Very nice. So now the throat is complete. And to start the wing of the fly, we're going to begin with another golden pheasant crest feather, this one facing downward but the same length. So strip your fluff. Prepare the feather for tying. Trim some of those barbs.
(DESCRIPTION)
[00:15:46.03] She pinches the end with tweezers.
(SPEECH)
[00:15:48.16] Flatten your stem, if you so choose. I think it helps.
(DESCRIPTION)
[00:15:56.37] Aligns it with the hook.
(SPEECH)
[00:15:58.69] See how that helps maintain that nice curve that we're looking for.
(DESCRIPTION)
[00:16:02.94] Ties it on.
(SPEECH)
[00:16:07.54] Perfect. All right.
(DESCRIPTION)
[00:16:11.29] And snips the thread.
(SPEECH)
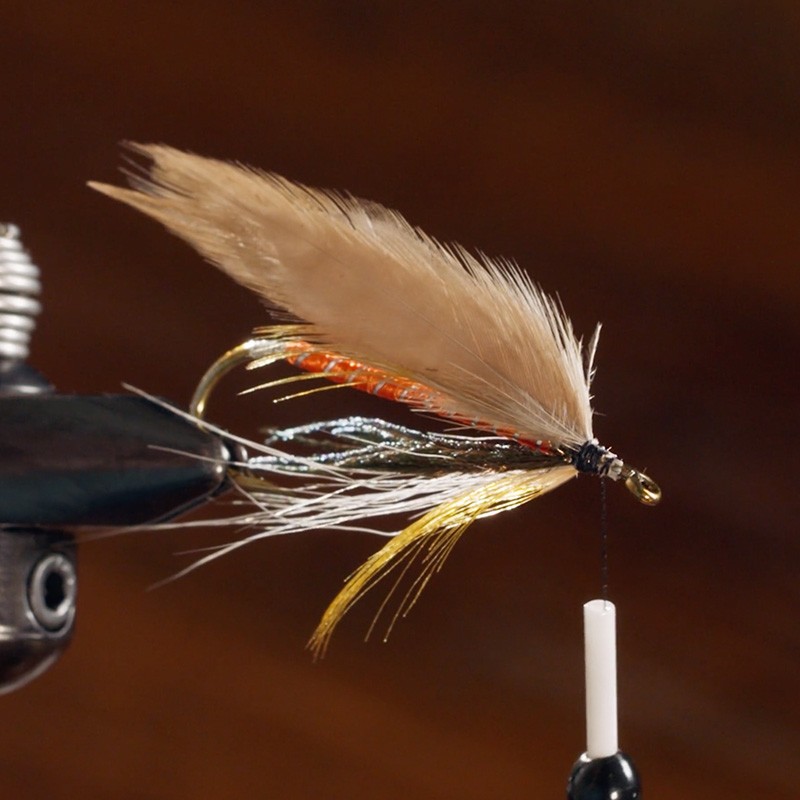
[00:16:14.50] We are ready to tie in the wing of this fly, which calls for four matched saddle hackles. This is a full cape of streamer saddles, and this is a grayish tan. I think Carrie's original recipe was-- they called it olive grey for the wing color, but this is pretty close to consistent with the original.
[00:16:43.97] Now, when I'm selecting my feathers for the wing, I'm looking for feathers that have nice thick barring or thick webbing at the base of the feather and a nice rounded tip, as opposed to a real pointy tip like some of these are further up in the feather. As far as length goes, we're looking for one just extending beyond the bend of the hook. Let's see.
[00:17:15.40] And pull out a clump, and then pick the best ones from my clump here.
(DESCRIPTION)
[00:17:24.00] She tugs at the feathers.
(SPEECH)
[00:17:31.89] All right, I like some of these shorter ones here.
(DESCRIPTION)
[00:17:35.04] Sorts them on the workbench.
[00:17:37.53] She holds one next to the hook.
(SPEECH)
[00:17:40.02] So sizing-- going to be just extending beyond the bend of the hook, like that. That one's a little rough at the bottom, so we'll make this one of the center feathers, I think.
[00:17:52.68] Now, what we want-- since there's four feathers, you're going to have two on one side that are stacked with the bottoms of the feathers facing inside the fly and then the opposite on the other side. And what you're trying to achieve there is as you're looking at the fly, the part of the feather that's facing out is the top of the feather, as it would be on the bird here.
(DESCRIPTION)
[00:18:16.80] She bundles the shorter feathers.
(SPEECH)
[00:18:19.89] So what I'm doing now is stacking my feathers two to a side, aligning the tips.
(DESCRIPTION)
[00:18:27.23] Smooths the tips with her fingers.
(SPEECH)
[00:18:29.13] And you could tie one side in first. Then the other side, you could tie in the two center feathers and then sandwich the two outer feathers. I think the easiest way to do it and the way to minimize your thread wraps, honestly, is just tying all four in at once, which is what I'm going to show you how to do here.
[00:18:53.07] So I've got these all oriented properly so the tops of the feathers are out. The tips are lined up.
(DESCRIPTION)
[00:19:03.11] She holds them next to the hook.
(SPEECH)
[00:19:05.94] Now we'll size them right about there, pinch at the tie in point. And then I'm going to get rid of all this fluff here at the end.
(DESCRIPTION)
[00:19:17.96] Cuts where she pinches.
(SPEECH)
[00:19:19.47] Now, I'm not stripping the barbules off to expose bare stem for this particular fly. Instead, on feather wing streamers, I like to tie a little bit of-- I like to capture some of the meat of the feather and the barbs against the stem. It makes for a much more durable fly. If I were just to tie these in by the stem, they would likely come free of the head after catching a fish, or even on your first cast sometimes.
[00:19:51.39] So I think this makes for a more durable fly. It also makes for a little better profile, I think, on the fly because it just squeezes that front a little bit down as you begin. Oops. I was going to say, as you begin, make sure you're-- I had a little fluff left there. Clean that up a little bit. There we go.
(DESCRIPTION)
[00:20:14.47] She starts again and wraps it with the black thread.
(SPEECH)
[00:20:19.04] Setting streamer wings can be tricky, but what I did was just pinching them between my fingers, holding on top of the hook shank. And then I use my pinch wrap to tie them into place. And those look pretty good. It's a good idea to take a look at the back side of your fly as you're tying, too. Sometimes, we forget that. It looks pretty even.
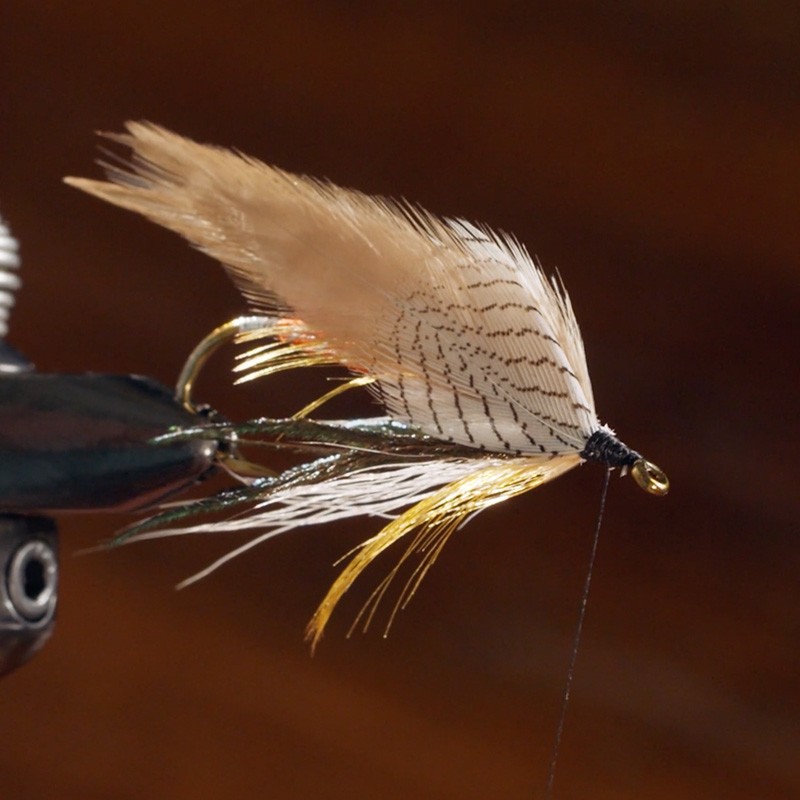
[00:20:44.63] Cover up some of those butt ends. Back to the base of the head there or the wing, and we'll get ready for the shoulders, which are silver pheasant. This is strung silver pheasant. You can also get it as a full skin, which I tend to prefer because you have more consistency in the quality of the feathers. And it's just a little easier to select what you're looking for. But this will work. And they're easier to find as a strung feather patch instead.
[00:21:19.28] So what I'm doing is trying is selecting two feathers that have similar barring patterns, similar shape. And I'm going to strip off the fluff so I have a little easier time working with them here.
(DESCRIPTION)
[00:21:32.64] She pulls the fluff off the ends with her fingers.
[00:21:35.60] She holds a feather next to the hook.
(SPEECH)
[00:21:37.58] So sizing these, going to cover about a third of the length of that wing. So I can visualize here where I need to be. Strip that. Prepare it for tying in.
[00:21:53.21] This I will tie in at the stem, but I'm going to use those. Trim a couple barbs so that I have that jagged edge. It helps with the really locking that in with your thread wraps. And then I can resize the second one by laying the first on top and stripping the feathers down to match.
(DESCRIPTION)
[00:22:16.86] Continues stripping the ends.
[00:22:23.62] She trims a side of the ends with scissors.
(SPEECH)
[00:22:30.88] And we'll tie in one at a time.
(DESCRIPTION)
[00:22:34.39] She holds one feather against the hook.
(SPEECH)
[00:22:37.21] These are tied in parallel to the hook shank.
(DESCRIPTION)
[00:22:42.81] Ties it on.
[00:22:46.22] Then adds the matching feather to the opposite side.
[00:22:50.62] She wraps thread around it to tie it on.
[00:22:57.94] Then trims the ends of the feathers.
(SPEECH)
[00:23:02.83] All right, we're on the home stretch. So honestly, at this point, this fly is very fishable. There's only one ingredient left. And it's fine to omit if you don't have access to the jungle cock eyes, which form the cheeks of the fly. But it does complete the original pattern that Carrie Stevens developed.
[00:23:29.27] Another alternative if you don't have true jungle cock-- it can be difficult to find-- is to use the false eyes. They're just painted on a piece of paper. Punch them out to size to your hook. That's an option. But we're going to use the real thing, very delicate, beautiful feathers here.
[00:23:48.67] I'm going to strip the fluff off.
(DESCRIPTION)
[00:23:51.11] She pulls the fluff with her fingers.
(SPEECH)
[00:23:53.35] Tie them in one at a time.
(DESCRIPTION)
[00:23:55.19] She holds it against the hook to tie.
(SPEECH)
[00:23:58.06] Again, this is called the cheek of the fly.
(DESCRIPTION)
[00:24:02.71] Then she adds a matching feather to the opposite cheek.
(SPEECH)
[00:24:06.13] Make sure you have the right side up here. There we go.
(DESCRIPTION)
[00:24:10.98] She finishes tying on the feathers and rotates the vise.
(SPEECH)
[00:24:14.35] And just take a look at it. Make sure they're nice and even.
(DESCRIPTION)
[00:24:20.91] She snips loose ends.
[00:24:28.69] Then she resumes wrapping with thread.
(SPEECH)
[00:24:31.14] All right, cover up all the butt ends of your material.
[00:24:38.19] And my final step is to use my whip finish tool to create the shape and profile of the head that I'm looking for here. Right now, I'm flattening my thread. When you use the Danville thread, you can flatten it. It's not a braided or corded thread. And that just helps create a very nice, neat, smooth head. And using the whip finish tool to create the shape that you're looking for is a nice way to ensure uniformity in that head.
(DESCRIPTION)
[00:25:14.74] After using the tool, she snips the thread.
(SPEECH)
[00:25:18.12] All right, now this fly is ready to go. However, I'm going to add one last step. This is a tribute to and out of respect for Carrie Stevens. Her signature at the end of every fly that she tied and designed was an alternating color, different color thread in the center of the head to form a band. That was her signature move.
[00:25:42.04] And a lot of tires won't do this, just out of respect for the original pattern for Carrie. But I would like to just show you how it would have been done and how you would recognize an authentic Carrie Stevens streamer pattern. The Grey Ghost has a red band, so I would have a couple wraps there, and then finish it off with a whip finish.
(DESCRIPTION)
[00:26:09.27] She adds the narrow red band, then uses the whip finish tool.
[00:26:17.58] She snips the end of the red thread.
(SPEECH)
[00:26:20.09] And finally, head cement. This helps ensure a more durable fly. It also makes a more presentation quality fly. You can even apply multiple coats of the head cement if you have a nice thin, high-penetrating cement. I would put in my one coat, let it dry, come back through once, twice, even three times, maybe finish with a clear lacquer if it was a presentation fly.
[00:26:51.65] But right now, that's ready to fish. Go catch some big brook trout and salmon. Good luck fishing the Grey Ghost. Tell us where you'd like to fly fish in the comments below. Also, let us know what kind of videos you'd like to see more of. And don't forget to like and subscribe so you don't miss our next video. For more fishing tips and inspiration, visit Explore L.L.Bean at llbean.com/explore. See you next time.


